Access Branding
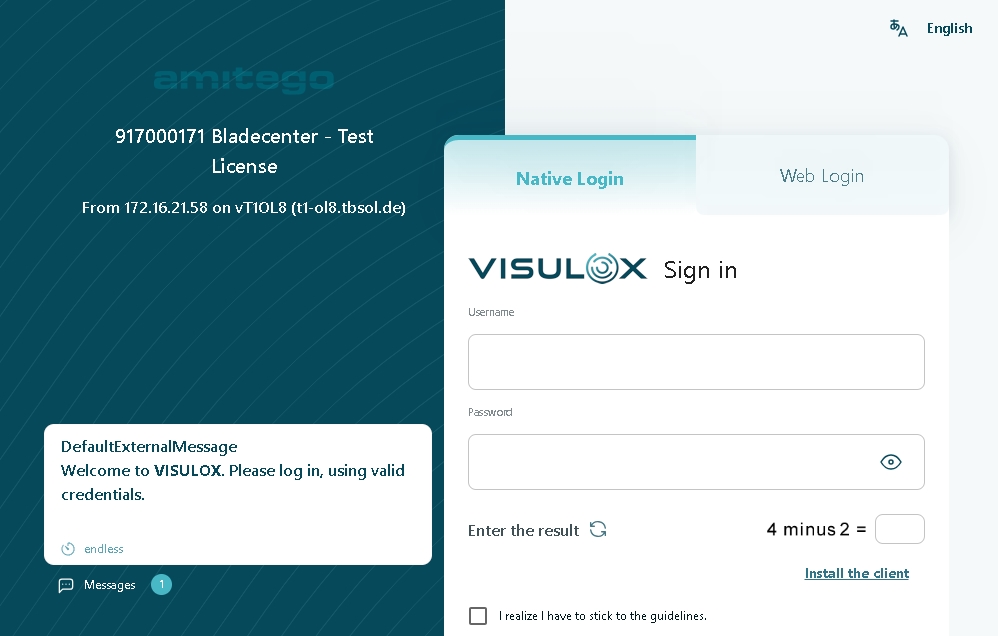
AboutWith default settings all users get the same design of the VISULOX PORTAL login page (aka landing page), With Access Branding it is possible to display different login page designs for |
Implementation
Since VISULOX 3.2 the design of the VISULOX PORTAL login page has been reworked completely to get a neutral view.
To achieve the display of different designs on the login page, various access URLs are needed.
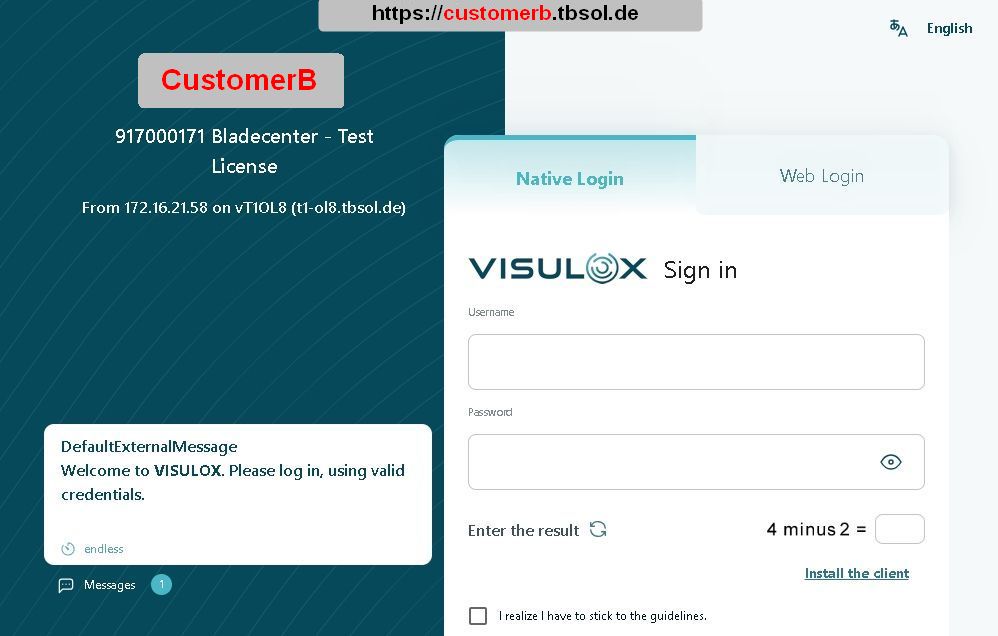
In the following example each customer will get his own access URL:
| Customer | Access URL |
|---|---|
| Customer A |
|
Customer B |
|
| Customer C | https://customerc.<domain>.com (other domains are possible as well). |

All this access URLs end on the same IP address. The certificates deposited on the VISULOX Gateways have to be issued again and enhanced with the names of the customers (alternate DNS names).
Command to import new key and certificate
visulox-gateway sslkey import --keyfile /tmp/<key>.pem --certfile /tmp/<cert>.crt --cacertfile /<cacert>.crt --keyalg RSAIt can be necessary to restart the VISULOX Service after importing new certificates for the VISULOX GATEWAY.
CLI command
Depending on the access URL a dedicated logo and the banner / connection information can be presented individually customized on the login page.
Usage
visulox config accesspointThe following subcommands are available:
| Command | Description |
|---|---|
| list | List all Access Brandings |
| add | Create an Access Branding configuration |
| edit | Edit an Access Branding configuration |
| delete | Delete an Access Branding configuration |
Access Branding elements (edit)
| Element | Description |
|---|---|
| -name <value> | FQDN of the used access point of the users <> |
| -gatewayip <value> | List of Gateway IP or mask - for any, use: "ANY" |
| -logo <value> | File name of logo presented the login page <> |
| -banner <value> | Banner text on the login page <> (placeholders are possible) |
| -color <value> | Main color of design <> |
| -background <value> | Background color of design (lhs loginpage) <> |
| -connection <value> | Connection text on the login page <> (placeholders are possible) |
-human <value> | Enable/disable/config captcha request on login page <> |
| -consent <value> | Enable/disable/config consent request on login page <> |
| -clients <value> | Enable/disable/config download of clients on login page <> |
Login is not possible if the entered hostname and the used VISULOX Gateway does not match the access point name and the configured Gateway IP.
On VISULOX local Gateways, the gatewayip must be set to "ANY".
Placeholders for banner and connection information
| Variable | Description |
|---|---|
| %SYSTEMID% | Unique system ID |
%LICENSE% | License name |
| %CUSTOMER% | Name of the customer |
| %HOST% | Hostname |
| %HOSTSHORT% | Short name of the host |
| %HOSTIP% | IP of the host |
| %HOSTIPLAST% | Last IP of the host |
| %NODE% | Logical name of the node |
| %RIP% | Remote IP address |
| %GWIP% | Gateway IP address |
| %GWIPLAST% | Last Gateway IP address |
| %GWHOST% | Gateway hostname |
| %GWNODE% | Gateway nodename |
| %AP% | Access Point |
| %APNODE% | Access Point node |
Command to setup Access Branding
Access Branding setup
visulox config accesspoint add -name <Access URL> -logo <file of the logos> -banner <text string banner> -connection <text string connection info> -gatewayip <ip>For example:
Examples for customera and customerb
visulox config accesspoint add -name customera.tbsol.de -logo "/tmp/custa.png" -banner %LICENSE% -connection "From %RIP% on %NODE% (%HOST%)" -gatewayip 0.0.0.0/0
visulox config accesspoint add -name customerb.tbsol.de -logo "/tmp/custb.png" -banner "Unique System ID: %SYSTEMID%" -connection "Host: %HOST% - Host IP: %HOSTIP%" -gatewayip 192.168.0.123
Example for setting captcha and consent
visulox config accesspoint edit -name customera.tbsol.de -consent true -human true
visulox config accesspoint edit -name customerb.tbsol.de -consent config -human false
Possible values for -consent and -human are: true / false / config
With the value config, the login.human.check and/or consent.enable from the global configuration will be used.
Check Access Branding entries
visulox config accesspoint list -verbose
    ----------------------------------------------------------------------------------------------------
    |        accesspoint |                       banner |      logo |                       connection |
    ----------------------------------------------------------------------------------------------------
    | customera.tbsol.de |                    %LICENSE% | custa.png |    From %RIP% on %NODE% (%HOST%) |
    | customerb.tbsol.de | Unique System ID: %SYSTEMID% | custb.png | Host: %HOST% - Host IP: %HOSTIP% |
    ----------------------------------------------------------------------------------------------------
Use portal attach -webtop after changes
visulox portal attach -webtopWorkspace
After login all users of all customers will still get the same Workspace design.
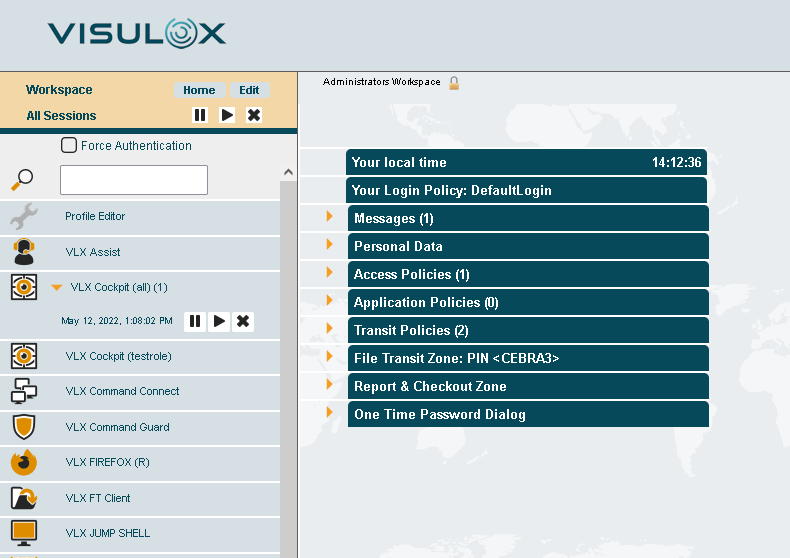
The different logos and the customized banner / connection information are only displayed to the according users on the login page.
In the Workspace, VISULOX Cockpit, etc potentially customized settings will be the same for all users, once logged in.
VISULOX Cockpit
VISULOX Administrators with access to the VISULOX Cockpit can use the different access points of the users for the VISULOX Policies as well.
For example: VISULOX Cockpit / Policies / Login Policy / Filter
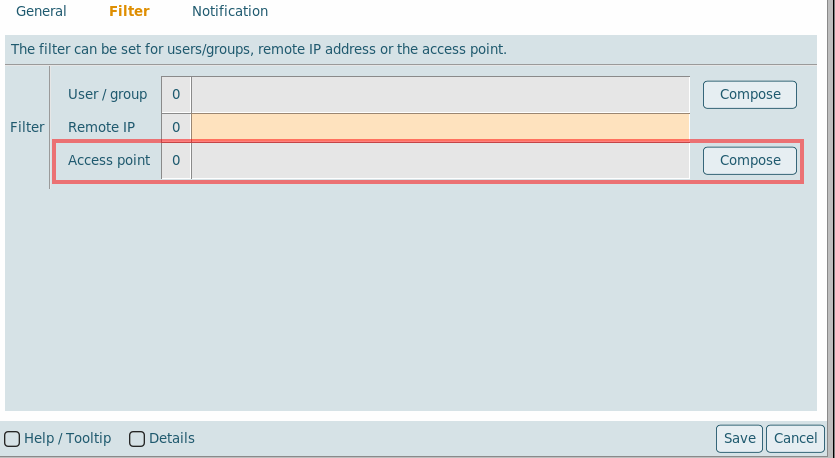
With a click on the compose button, a list of the available access points is displayed and can be selected for the filter.

Related articles
- Access Branding
- How to change the VISULOX logos and colors
- How to change the license name / banner
- How to change the VISULOX logos and colors
- Access Branding
- How to change the license name / banner
- Access Branding
- How to change the VISULOX logos and colors
- How to change the license name / banner
- How to change the VISULOX logos and colors
- How to change the license name / banner
- Access Branding
- How to change the VISULOX logos and colors
- Access Branding
- How to change the license name / banner