VISULOX4_QuickInstallGuide_OL8
This is a step by step guide to install the VISULOX PORTAL Service, local VISULOX GATEWAY and the VISULOX Service on a stand-alone server. |
Setup of an Oracle Linux 8 server with basic setup
The recommended platform is Oracle Linux 8 with at least 10Gbyte for the OS, 20Gbyte for VISULOX PORTAL Service
and 30 Gbyte for the VISULOX Service free space on the hard disc (small installation)VISULOX can be virtualized, the disk must NOT have "Thin provisioning" enabled.
The /opt directory must NOT be mounted with -nosuid parameter.
umask 022 is recommended for installation and start of the VISULOX PORTAL Service
Symbolic links are not supported
The users ttasys and ttaserv have to be placed in the /home directory, if created manually before installation.
The recommended VISULOX version is the latest VISULOX release
The recommended user repositories are all repositories, that are supported by the VISULOX PORTAL Service
Firewall configured properly or disabled
/etc/hosts should look like: 127.0.0.1 localhost localhost.localdomain
NTP or Chrony enabled
For Ports, see: Network communication within VISULOX
Make sure that correct hostnames are used for the servers in the environment.
Hostnames must not contain underscores (because of RFC 952 and domain names with underscores)!
The FQDN of the host must not exceed 50 characters!
Changing hostnames after installation of VISULOX is not supported!
Checking the hostname (must be identical):
nslookup $(hostname -f) --> Hostname and IP address is displayed
nslookup <IP address> --> IP address and hostname is displayed

getent ahosts $(/opt/tarantella/bin/bin/ttahostname) --> IP address and hostname is displayed
getent hosts <IP address> --> IP address and hostname is displayed

getent ahost localhost --> IP address is displayed (127.0.0.1)
getent hosts 127.0.0.1 --> IP address (127.0.0.1) and hostname (localhost) is displayed
Update Oracle Linux 8 and install dependencies
Installing VISULOX 4.x on Linux platforms, the yum / dnf command has to be used to ensure that any package dependencies are resolved automatically.
This means that yum must be configured to use a suitable Linux package repository. Make sure that oracle_appstream_latest and ol8-epel are in yum repolist as well.
dnf repolist
This system is receiving updates from Unbreakable Linux Network or Spacewalk.

repo id                                                                      repo name

ol8-codeready                                                                ol8-codeready
ol8-epel                                                                     ol8-epel
ol8_addons                                                                   ol8_addons
ol8_appstream_latest                                                         ol8_appstream_latest
ol8_x86_64                                                                   ol8_x86_64
ol8-codeready is needed for transitmapping.
For the Epel repository on Red Hat 8 use:
dnf install https://dl.fedoraproject.org/pub/epel/epel-release-latest-8.noarch.rpmdnf install java-11-openjdk
dnf updateDownload VISULOX packages
All VISULOX packages can be downloaded from amitego-engineering.
VISULOX packages
mkdir /root/POC
cd /root/POC

Copy all downloaded files to /root/POC

- visulox-rte-1.2.0-1.el8.x86_64.rpm
- visulox-4.3.2-1.el8.x86_64.rpm
- visulox-portal-4.3.2-1.el8.x86_64.rpm
- visulox-gateway-4.3.2-1.el8.x86_64.rpm
Installation
VISULOX RTE and VISULOX Service 4.x
cd /root/POC
dnf install visulox-rte-1.2.0-1.el8.x86_64.rpm
dnf install visulox-4.3.2-1.el8.x86_64.rpm
VISULOX PORTAL Service and VISULOX GATEWAY
dnf install visulox-portal-4.3.2-1.el8.x86_64.rpm
dnf install visulox-gateway-4.3.2-1.el8.x86_64.rpm

visulox-portal start
Configure local VISULOX GATEWAY
visulox-portal stop

visulox-portal discover gateway --local

visulox-portal start
visulox-gateway start
On external VISULOX Gateways, use the following command to add the VISULOX Portal Array:
visulox-gateway server add-array --name osgd --serverurl <https://fqdn of the primary portal server>The server URL has to be used only, without ".../sgd/" at the end.
After setup of the VISULOX Gateway, the load balancer probing template file is available.
(See also: How to create a feedback page for Load Balancers in the VISULOX GATEWAY configuration)
Attach VISULOX Service and start
visulox portal attach

visulox start

visulox status
visulox integrity
Done / first steps
Login to your server (https://<full qualified domain name>) as administrator with root password. Launch "VLX Cockpit (all)" from the Workspace.
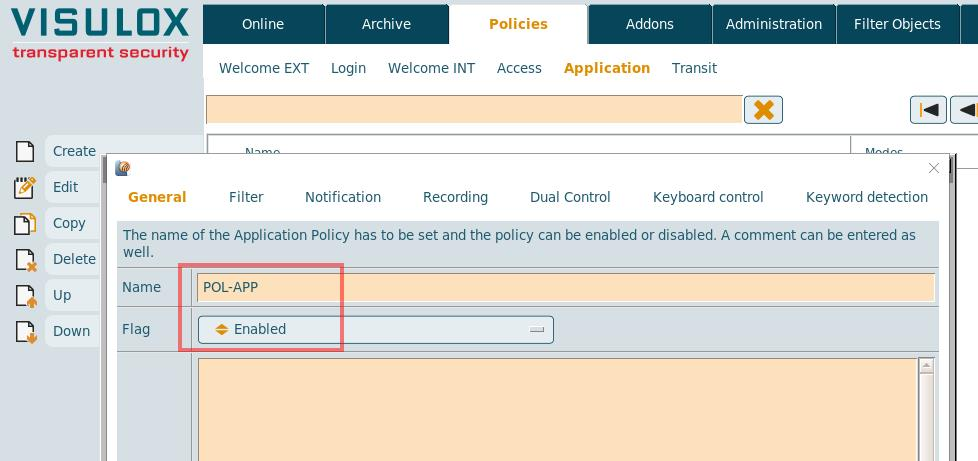
In the VISULOX Cockpit go to Policies / Application Policy and configure "VLX Jump Shell" for recording:
Choose "Create" :
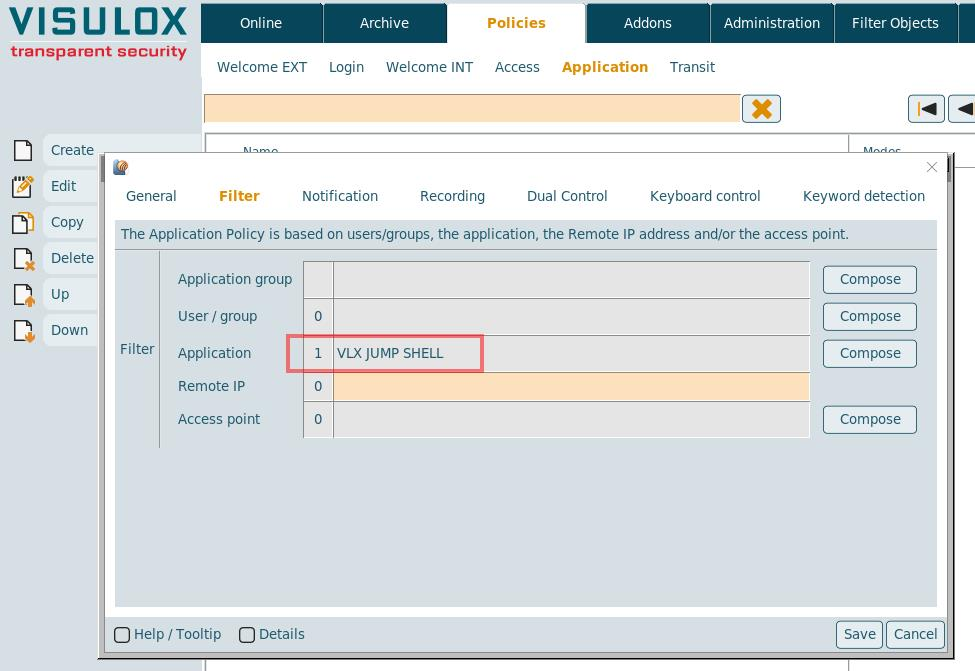
Change to the "Filter" tab and choose "Compose" for applications. Select "VLX Jump Shell" from the list and "Add". Then "Save":
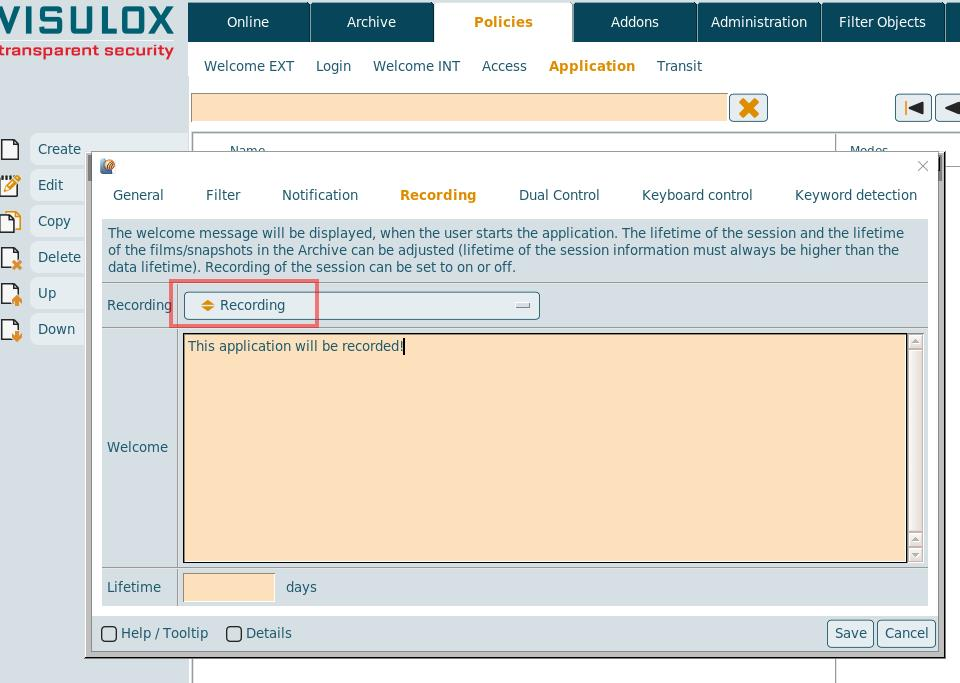
Change to the "Recording" tab and enable recording by choosing "Recording enabled".
A comment can be written as seen in the example.
Launch the VLX Jump Shell application from the Workspace.
More steps
Use the VISULOX PORTAL Console to change other applications e.g. from "Client Window Management Mode" to "Independent Window" and add a window manager.
Add a new X11 application and use vlxUnix.exp as connection script.
Add a Windows application and use vlxWindows.exp as connection script.
Modify the command line to an available RDP Server in your network for VLX RDP. Launch VLX RDP and open the file explorer.
Go to drive E and place a file there. Go to your Workspace and expand the VISULOX Transit Area.
The file can be seen in the Transit Zone. Upload a file and it will be seen in your Windows session below E:\checked .
Checkout in VIUSLOX Cockpit / Archive what happens on the system.
For more detailed information about VISULOX, please refer to the full documentation or contact support@amitego.com.