
|
This document describes the installation and setup procedure for the following components on a single Linux server:
During the VISULOX Portal setup (
This guide is primarily intended for:
|
1. Prerequisites
1.1 RPMs
-
VISULOX Portal RPMs: vlx-portal-rte-5.0.1.el9.x86_64.rpm, vlx-portal-5.0.1.el9.x86_64.rpm, vlx-connector-5.0.1.el9.x86_64.rpm
-
VISULOX Core RPMs: visulox-rte-1.2.0-1.el9.x86_64.rpm, vlx-core-5.0.1.el9.x86_64.rpm
RPMs can be downloaded from Download Links.
1.2 PostgreSQL & KeyDB
During the interactive setup-master process, VISULOX can automatically install and configure PostgreSQL and KeyDB.
Alternatively, you may install and configure these services manually before running setup.
If you choose manual installation, refer to:
PostgreSQL 16 Installation and Setup for VISULOX
PostgreSQL Installation and Setup for VISULOX on RHEL / Oracle Linux 9
KeyDB Installation and Setup for VISULOX
KeyDB Installation and Setup for VISULOX on RHEL / Oracle Linux 9
Both approaches are supported.
1.3 Time Synchronization (Mandatory)
⚠️ Critical Requirement
The server system time must be correct and synchronized before running:
-
visulox start -
setup-master -
Any Docker-based service initialization (e.g. PostgreSQL container)
Incorrect system time can cause:
-
TLS certificate validation failures
-
Docker image pull errors
-
PostgreSQL container startup failure
-
setup-master interruptions
Example failure:
tls: failed to verify certificate: x509: certificate has expired or is not yet valid
current time 2026-02-16T14:04:39+01:00 is before 2026-02-19T20:57:44Z
Check and synchronize:
REMOTE_TIME=$(curl -kfsSI https://www.google.com | awk -F': ' '/^[Dd]ate:/{print $2}' | tr -d '\r')
echo "$REMOTE_TIME"
sudo date -s "$REMOTE_TIME"
sudo hwclock --systohc
1.4 Connect to Server (once)
Run from your client:
ssh -p 22 <SERVER_USER>@<SERVER_HOST>
2. Server Preparation
This steps vary based on OS.
-
For Oracle 9.8 run:
# 1. Install the official EPEL release package
sudo dnf install -y oracle-epel-release-el9

# 2. Add the official Xpra repo
sudo tee /etc/yum.repos.d/xpra.repo >/dev/null <<EOF
[xpra]
name=Xpra Repository for Oracle Linux 9
baseurl=https://xpra.org/stable/oraclelinux/9/x86_64/
enabled=1
gpgcheck=0
EOF

# 3. Add EXCLUDES to AppStream and EPEL via setopt
# This modifies the existing repo files instead of creating duplicates
sudo dnf config-manager --setopt="ol9_appstream.exclude=xpra*" --save
sudo dnf config-manager --setopt="ol9_developer_EPEL.exclude=xpra*" --save

# 4. Enable all required channels
sudo dnf config-manager --set-enabled ol9_appstream
sudo dnf config-manager --set-enabled ol9_developer_EPEL
sudo dnf config-manager --set-enabled ol9_codeready_builder
-
For RHEL 9.8 run:
If you installed RHEL directly from the official Red Hat ISO image, you need to activate the Red Hat account/subscription before using online repositories, so that you can access the online resources. (Of course, you can also use a local repo -RHEL DVD ISO as local repo-, but to use the online repositories, follow the method below)
sudo subscription-manager register
and then:
sudo subscription-manager repos --enable=rhel-9-for-x86_64-baseos-rpms
sudo subscription-manager repos --enable=rhel-9-for-x86_64-appstream-rpms
# 0. Install config-manager if needed
sudo dnf install -y dnf-plugins-core

# 1. Enable RHEL CodeReady Builder repository. Change $(arch) based on your CPU architecture.
sudo subscription-manager repos --enable codeready-builder-for-rhel-9-$(arch)-rpms
# sudo subscription-manager repos --enable codeready-builder-for-rhel-9-x86_64-rpms

# 2. Install official EPEL release package for RHEL 9
sudo dnf install -y https://dl.fedoraproject.org/pub/epel/epel-release-latest-9.noarch.rpm

# 3. Add the official Xpra repo for RHEL 9
sudo tee /etc/yum.repos.d/xpra.repo >/dev/null <<'EOF'
[xpra]
name=Xpra Repository for RHEL 9
baseurl=https://xpra.org/dists/RedHat/9/x86_64/
enabled=1
gpgcheck=0
EOF

# 4. Exclude xpra packages from AppStream and EPEL
# On RHEL the repo IDs are normally: rhel-9-for-x86_64-appstream-rpms and epel
sudo dnf config-manager --setopt="rhel-9-for-x86_64-appstream-rpms.exclude=xpra*" --save
sudo dnf config-manager --setopt="epel.exclude=xpra*" --save

# 5. Clean metadata
sudo dnf clean all
sudo dnf makecache

# 6. Check which xpra-common package will be selected
dnf info xpra-common
It is a good idea to use dnf update on the servers to get the latest packages before continuing with the setup.
3. Create Temporary Folders on Server
3.1 Clean-up old installation (if needed)
# Step 1: Uninstall any existing packages
sudo dnf remove vlx-connector vlx-portal vlx-portal-rte visulox-rte -y || true
sudo rm -rf /opt/visulox-portal* || true
sudo rm -rf /var/vlx-portal || true
sudo rm -rf /opt/visulox || true
sudo rm -f /opt/visulox-portal/.setup_done || true
sudo systemctl daemon-reload || true
3.2 Create temporary folders
rm -rf /tmp/vlx-core /tmp/vlx-portal || true && mkdir -p /tmp/vlx-core /tmp/vlx-portal
4. VISULOX Core
4.1 Copy files to the vlx-core folder
- vlx-core-5.0.1-1.el9.x86_64.rpm
- visulox-rte-1.2.0-1.el9.x86_64.rpm
4.2 Install & Configure VISULOX Core
Install & configure VISULOX Core:
cd /tmp/vlx-core
sudo dnf install -y vlx-*.rpm
Start VISULOX Core services:
sudo visulox start
5 VISULOX Portal / Connector
5.1 Copy files to the vlx-portal folder
- vlx-portal-rte-5.0.1-1.el9.x86_64.rpm
- vlx-portal-5.0.1-1.el9.x86_64.rpm
- vlx-connector-5.0.1-1.el9.x86_64.rpm
5.2 Install & Setup VISULOX Portal
Step 1 – Install RPM Packages
cd /tmp/vlx-portal
sudo dnf install vlx-portal-rte-*.rpm -y
sudo dnf install vlx-portal-*.rpm -y
sudo dnf install vlx-connector-*.rpm -y
Step 2 – Run Setup (Interactive)
Interactive Mode
setup-master interactively installs and configures IPs, host names, admin user, the main system components, such as the database and KeyDB. It also allows you to configure connections to Microsoft Entra, LDAP, and Active Directory. Most of these items can be modified later.
sudo /opt/visulox-portal/bin/vlx-portald setup-master
Optional: Running Setup (Non-interactive)
In some cases, you may not want to enter the inputs of the setup-master command interactively. For example, if you are writing a script, you need to run this command in a non-interactive mode to have control over the inputs.
To do so, you need to create template files for the setup command to run. Run the following command:
sudo /opt/visulox-portal/bin/vlx-portald setup-master --get-template /tmp/vlx-portal
After running the above command, a setup_template.json template file and a setup_template_README.txt file will be created in the /tmp/vlx-portal directory.
An example of a default-generated template file looks like this:
{
  "CurrentServerIP": "",
  "CurrentServerHost": "",
  "GatewayAddress": "",
  "GatewayPort": 8180,
  "RestAPIPort": 8080,
  "SOAPAPIPort": 8090,
  "MetricAPIPort": 9000,
  "ConnectorAPIPort": 8085,
  "ServerRegion": "default",
  "NGINXResolverIPs": [
    "172.17.3.1"
  ],
  "InstallPostgreSQL": true,
  "NewPostgreSQLConfig": {
    "Host": "",
    "Port": 5432,
    "User": "",
    "Password": "",
    "Database": "visuloxdb",
    "Secure": false,
    "InsecureSkipVerify": true,
    "CACertPath": "",
    "ClientCertPath": "",
    "ClientKeyPath": ""
  },
  "ExistPostgreSQLConfig": {
    "Host": "",
    "Port": 0,
    "User": "",
    "Password": "",
    "Database": "",
    "Secure": false,
    "InsecureSkipVerify": false,
    "CACertPath": "",
    "ClientCertPath": "",
    "ClientKeyPath": ""
  },
  "InstallKeyDB": true,
  "NewKeyDBConfig": {
    "Host": "",
    "Port": 6379,
    "User": "",
    "Password": "",
    "Database": "",
    "Secure": false,
    "InsecureSkipVerify": true,
    "CACertPath": "",
    "ClientCertPath": "",
    "ClientKeyPath": ""
  },
  "ExistKeyDBConfig": {
    "Host": "",
    "Port": 0,
    "User": "",
    "Password": "",
    "Database": "",
    "Secure": false,
    "InsecureSkipVerify": false,
    "CACertPath": "",
    "ClientCertPath": "",
    "ClientKeyPath": ""
  },
  "ConnectToLDAP": false,
  "LDAPConfig": {
    "enabled": false,
    "server_host": "",
    "server_port": 0,
    "admin_user": "",
    "admin_password": "",
    "use_tls": false,
    "insecure_skip_verify": false,
    "base_dn": "",
    "ldap_user_filter": ""
  },
  "ConnectToAD": false,
  "ADConfig": {
    "enabled": false,
    "server_host": "",
    "server_port": 0,
    "admin_user": "",
    "admin_password": "",
    "use_tls": false,
    "insecure_skip_verify": false,
    "base_dn": "",
    "ldap_user_filter": ""
  },
  "EntraLoginActive": false,
  "AzureTenantID": "",
  "AzureExpectedAUD": "",
  "AzureClientSecretID": "",
  "AzureCookieSecret": "",
  "Loki": {
    "Enabled": false,
    "URL": "",
    "TenantID": "",
    "AuthToken": "",
    "ServiceName": "vlx-portal",
    "HostLabel": "",
    "QueueSize": 5000,
    "BatchSize": 200,
    "FlushIntervalMS": 1000,
    "RequestTimeoutMS": 3000,
    "MaxRetries": 4,
    "InitialBackoffMS": 200,
    "MaxBackoffMS": 2000,
    "DropWhenQueueFull": true
  },
  "AdministratorUser": "root",
  "DefaultOtherProfileUsername": "vlx-default-user"
}
You need to fill in the required items of this template file by reading the README file. Then, consider you have prepared a setup JSON file using the template file named setup.json; You can run the setup master command non-interactively as follows:
sudo /opt/visulox-portal/bin/vlx-portald setup-master --file /path/to/setup.json
Regarding the ExistKeyDBConfig.DBCACertPath, ExistKeyDBConfig.ClientCertPath, and ExistKeyDBConfig.DBClientKeyPath configs, you only have to set them if your keydb is installed before, and it uses a TLS connection using a “self-signed” certificate. If your keydb certificates are not self-signed, leave these fields empty.
The same way, regarding ExistPostgreSQLConfig.CACertPath, ExistPostgreSQLConfig.ClientCertPath, and ExistPostgreSQLConfig.ClientKeyPath you have to set all of them if you have a self-signed cert and want to have full-verification.
Regarding PostgreSQL, if you are using a pre-installed instance, you should have an empty database named visuloxdb. The user you create must have full access to this database. For example, suppose you want to create a user with the username visulox and the password your_secure_password, and then create a database named visuloxdb. Make sure that the visulox user is granted all necessary privileges on this database, as shown below:
CREATE DATABASE visuloxdb;

CREATE USER visulox WITH PASSWORD 'your_password';

GRANT ALL PRIVILEGES ON DATABASE visuloxdb TO visulox;

ALTER DATABASE visuloxdb OWNER TO visulox;

\c visuloxdb

GRANT ALL ON SCHEMA public TO visulox;
ALTER SCHEMA public OWNER TO visulox;
LDAP/Active Directory integration
To integrate LDAP or Active Directory on this server, enter their addresses during interactive setup master mode or in the config file during non-interactive setup master mode.
Step 3 - Attach Portal
Run on the server:
sudo visulox portal attach -proxy
6. Copy Visulox Client files to the Portal Server
The Visulox Client files must be extracted from vlx-vispra-clients-1.0.0.zip and copied to the /etc/nginx/html/vlx/client/ folder (create the client folder, if it does not exist) on the portal server.
Run systemctl reload nginx after copying the files.
Now the client files are available for download via the login page for users.
7. Reinstall XPRA Web Components (Optional)
This step is not necessary unless the XPRA version is incorrect (xpra --version must be equal to or greater than `xpra v6.4.3-r0` ) or you receive a 404 error when starting XPRA on the web.
In some cases, the XPRA HTML5 / Web components may not be installed correctly during the initial installation.
Step 1 – XPRA Components Installation
To ensure all required XPRA components are properly installed, run the following command:
dnf reinstall -y xpra-html5 xpra-common xpra-server
Step 2 – Verify XPRA Installation
Verify that XPRA is installed and accessible by checking its version:
xpra --version
If the command returns a version number, XPRA has been installed successfully.
xpra --version
xpra v6.4.3-r0R
8. Process Check
Run on the server:
ps auxwwf | grep "vlx\|visulox\|opt" | grep -v "ps auxwwf"
Bonus 1: Change Log Level to Debug
Portal:
vi /opt/visulox-portal/configs/config.json
# Change Logger.Level to "debug"
# Set `ExtraFilePath` to `/var/log/visulox-portal/portal.log`.

chown vlx:vlxgroup /var/log/visulox-portal/portal.log
chmod 777 /var/log/visulox-portal/portal.log
Connector:
vi /opt/visulox-portal-connector/configs/config.json
# Change Logger.Level to "debug"
# Set `ExtraFilePath` to `/var/log/visulox-portal-connector/connector.log`.
Restart services:
sudo visulox restart

systemctl restart vlx-portal
systemctl status vlx-portal

systemctl restart vlx-connector
systemctl status vlx-connector
Logs:
# Portal:
tail -f /var/log/visulox-portal/portal.log

# Connector:
tail -f /var/log/visulox-portal-connector/connector.log
Bonus 2: Portal Configuration Modification After Installation
To change the configuration provided during the setup, update the following config file:
/opt/visulox-portal/configs/config.json
Then restart the vlx-portal service:
systemctl restart vlx-portal
Note: Make sure you know what you are doing before making any changes. Keep a backup of the configuration file before modifying it.
Bonus 3: Native Client - Supported Operating Systems & Installation
VISULOX PORTAL provides a modern login mechanism. Therefore a client side component has to be downloaded and registered in the browser.
Login screen:
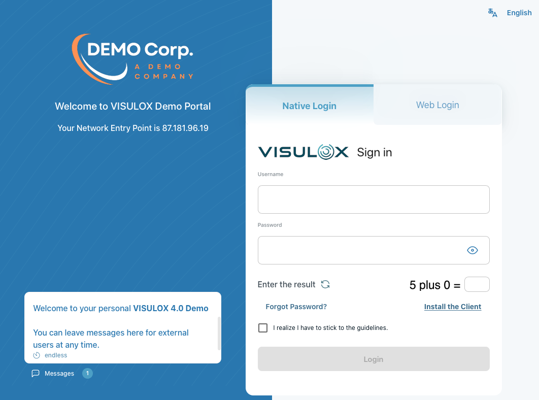
Choose "Install the client" link before the first login and download the client file.
It is also possible to choose "Web Login" to use the HTML5 Client.
|
OS |
Installation Steps |
|
macOS |
|
|
Windows |
|
|
Linux (Partially) |
Compatibility Note: XPRA version 6.4.3 has been successfully tested on Ubuntu 24.04 LTS (Noble). |
Versions
Using the latest version delivered with Visulox is recommended.